-
Marco Del Tufo authoredMarco Del Tufo authored

user-registration.md.bak 8.08 KiB
User Registration
====
## Register users in ELN Interface
Users can only be registered by someone with *Instance admin* role:
1. Go to the **User Manager**, under **Utilities**.
2. Click the +**New** **User** button.

3. Select the **Authentication Service**:
a. **Default Authentication Service**. This can be LDAP or SSO.
b. **File Authentication Service**. In this case a username and password need to be created.

4. **User ID**. for LDAP authentication, this is the LDAP username; for SSO authentication this is the email address of the user.

For file-based authentication provide username and password. The password can later be changed by the user.

## Default roles assigned in ELN
When a user is registered via the ELN interface, a *Space* (folder) with
the name of the user is automatically created under the Lab Notebook
main menu. The user is also assigned some default roles:
1. *Space admin* of the *Space* created for him/her under the notebook.
2. *Space user of* the Inventory *Spaces* (MATERIALS, METHODS by
default), the STOCK\_CATALOG and the STORAGE *Spaces*.
3. *Space Observer* of the STOCK\_ORDERS, ELN\_SETTINGS and
PUBLICATIONS S*paces*.
Modification to default rights can be granted by an *Instance admin*
from the *admin UI*, as explained below.
Overview of roles:
[openBIS Roles](./user-registration.md#openbis-roles)
## Register users from the admin UI
When users are registered via the admin UI no default roles are
assigned.
To register new users from the admin UI:
1. go to the **Users** tab. The **Users** and **Groups** will show in
the main menu on left had side.
2. Click on **Users** in the menu: the **Add** button at the bottom of
the menu will become active (blue)
3. Click the **Add** button
4. Enter the U**ser Id**. This is the LDAP username, when LDAP
authentication is used, or the email address if SSO is used. Please
note that file-based authentication (where username and password can
be created) is not supported by the admin UI.
5. **Home space**: this sets the default folder a user sees marked as
**My Space** in the Lab Notebook.
6. Click the **Add Role** button at the bottom of the page to assign a role to the user.
7. Click the **Add Group** button at the bottom of the page to assign a
user to a group of users.

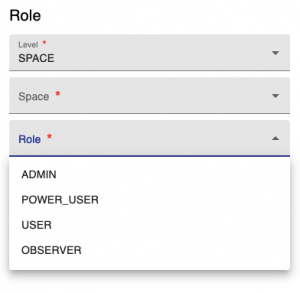
8. To assign a role to a user, first the **Level** needs to be selected
(Instance, Space, Project) .
9. If level is Instance, you can directly select a role (Admin, Observer). If the level is Space or Project, you first need to select the Space or Project and then assign a [Role](./user-registration.md#openbis-roles).
10. Multiple roles can be assigned to a user.
11. Roles can be removed from the **Remove** button at the bottom of
the page.
12. After making the necessary changes, press the **Save** button.

Note: for using the ELN interface, it is necessary to assign every user
or user group the OBSERVER role to the space ELN\_SETTINGS.
## Create users groups in admin UI
It is possible to create groups of users and assign rights to a group:
1. go to the **Users** tab. The **Users** and **Groups** will show in
the main menu on left had side.
2. Click on **Groups** in the menu: the **Add** button at the bottom of
the menu will become active (blue)
3. Click the **Add** button
4. Enter a **Code** for the group. This is the equivalent of a name,
but Codes can only contain numbers, letters and the following
symbols: . – \_
5. You can now assign registered users to the group and assign Roles as
explained above.

## openBIS roles
### Observer
This role can be assigned to the whole openBIS instance (*Instance
Observer*) or to specific *Spaces* or *Projects* (*Space* or *Project
Observer*). Users with this role have read-only access to the whole
openBIS (*Instance Observer*), or to a specified *Space* or *Project*
(*Space* or *Project Observer*).
An Observer can see and search everything in an openBIS instance or the
*Space/Project* which they have access to. They can also download
datasets. They cannot modify nor delete anything.
### Space/Project User
Extends Observer permissions with some creating and editing
functionality. Permissions are limited to specified *Space(s)* or
*Project(s)*.
Can do everything that Observer and additionally:
- create - objects
- collections
- edit
- objects
- collections
- projects
### Space/Project Power User
Extends *Space/Projec*t User permissions with some deleting, editing and
processing functionality. Permissions are limited to specified
*Space(s)* or *Project(s)*.
Can do everything that *Space/Project* User and additionally:
- create projects
- delete
- projects
- data sets
- objects
- collections
Please note that this role cannot be assigned via the ELN UI, only via
admin UI.
### Space/Project Admin
Extends Space/Project Power User permissions allowing to manage roles
and projects inside given *Space(s)* or *Project(s)*.
Can do everything that Space/Project Power User and additionally:
- assign and remove Space/Project roles
### Instance Admin
Has the full access to given openBIS instance.
Can do everything that Space/Project Admin and additionally:
- create
- space
- material
- person
- property type
- vocabulary
- material type
- object type
- collection type
- data set type
- create/delete instance admin role
- edit
- material
- property type
- property type assignment
- vocabulary
- material type
- object type
- collection type
- data set type
- assign/unassign property type
- delete
- space
- vocabulary terms
- material type - sample type
- experiment type
- data set type
Please note that this role cannot be assigned via the ELN UI, only via
admin UI.
Updated on April 26, 2023
## User Profile
In the User Profile, a user who is logged in into openBIS can find the
following information:
1. **First Name**
2. **Last Name**
3. **Email**
4. **openBIS session token**
5. **Zenodo API Token** ([Export to
Zenodo](../../../general-users/data-export.md#export-to-zenodo))
First name, last name and email are automatically filled in when LDAP or
SSO are used for authentication.
In case of file-based authentication, this information can be entered
here directly from the user.

For file-based authentication, users can also change their password
here, from the **Change Password** option under the **More..** dropdown.

Updated on June 28, 2022
## Assign home space to a user
When a home space is assigned to a user, this becomes marked as **My
Space** for that user in the lab notebook, as shown below.

When users are registered via the ELN UI, a *Space* with their username
is created (see [User
Registration)](./user-registration.md)
and this is automatically set as home space for the user.
The same happens in multi-group instances where spaces are created for
each user in the lab notebook section.
An *instance admin* can change the home space of a user or assign one to
a user that does not have a home space assigned from the admin UI, as
shown below.

Please note that when a user is inactivated, the home space assigned to
that user is moved in the ELN UI to the folder **Others (disabled).** If
this is not desired, the space should be removed as home space from the
inactivated user. This can be done by an *instance admin*.
Updated on April 26, 2023