Newer
Older

## Register users in ELN Interface

Users can only be registered by someone with *Instance admin* role:

1.  Go to the **User Manager**, under **Utilities**.
2.  Click the  +**New** **User** button.
13
14
15
16
17
18
19
20
21
22
23
24
25
26
27
28
29
30
31
32
33
34
35
36
37
38
39
40
41
42
43
44
45
46
3. Select the **Authentication Service**:
a. **Default Authentication Service**. This can be LDAP or SSO.
b. **File Authentication Service**. In this case a username and password need to be created.

4. **User ID**. for LDAP authentication, this is the LDAP username; for SSO authentication this is the email address of the user.

For file-based authentication provide username and password. The password can later be changed by the user.

## Default roles assigned in ELN
When a user is registered via the ELN interface, a *Space* (folder) with
the name of the user is automatically created under the Lab Notebook
main menu. The user is also assigned some default roles:
1. *Space admin* of the *Space* created for him/her under the notebook.
2. *Space user of* the Inventory *Spaces* (MATERIALS, METHODS by
default), the STOCK\_CATALOG and the STORAGE *Spaces*.
3. *Space Observer* of the STOCK\_ORDERS, ELN\_SETTINGS and
PUBLICATIONS S*paces*.
Modification to default rights can be granted by an *Instance admin*
from the *admin UI*, as explained below.
Overview of roles:
When users are registered via the admin UI no default roles are
assigned.
To register new users from the admin UI:
1. go to the **Users** tab. The **Users** and **Groups** will show in
the main menu on left had side.
2. Click on **Users** in the menu: the **Add** button at the bottom of
the menu will become active (blue)
3. Click the **Add** button
4. Enter the U**ser Id**. This is the LDAP username, when LDAP
authentication is used, or the email address if SSO is used. Please
note that file-based authentication (where username and password can
be created) is not supported by the admin UI.
5. **Home space**: this sets the default folder a user sees marked as
**My Space** in the Lab Notebook.
6. Click the **Add Role** button at the bottom of the page to assign a
role to the user.
7. Click the **Add Group** button at the bottom of the page to assign a
user to a group of users.

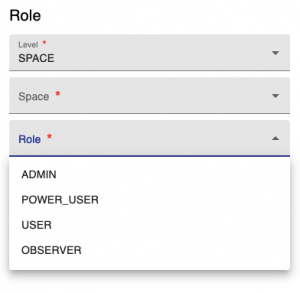
8. To assign a role to a user, first the **Level** needs to be selected
(Instance, Space, Project) .
9. If level is Instance, you can directly select a role (Admin, Observer). If the level is Space or Project, you first need to select the Space or Project and then assign a [Role](./user-registration.md#openbis-roles).
10. Multiple roles can be assigned to a user.
11. Roles can be removed from the **Remove** button at the bottom of
the page.
12. After making the necessary changes, press the **Save** button.

Note: for using the ELN interface, it is necessary to assign every user
or user group the OBSERVER role to the space ELN\_SETTINGS.

## Deactivate users
Users can be deactivated in the admin UI:
1. Select the user to deactivate in the left menu of the **USERS** tab
2. Click the **EDIT** button on the right bottom corner
3. Unselect the **Active** checkbox

## Remove users
Users can be removed from openBIS only if they have not registered anything in the system. If they have, they can only be deactivated, not removed.
Users can be removed in the admin UI, by selecting the user in the left menu of the **USERS** tab and clicking the **REMOVE** button at the bottom of the menu, as shown below.

## Create users groups in admin UI
It is possible to create groups of users and assign rights to a group:
1. go to the **Users** tab. The **Users** and **Groups** will show in
the main menu on left had side.
2. Click on **Groups** in the menu: the **Add** button at the bottom of
the menu will become active (blue)
3. Click the **Add** button
4. Enter a **Code** for the group. This is the equivalent of a name,
but Codes can only contain numbers, letters and the following
symbols: . – \_
5. You can now assign registered users to the group and assign Roles as
explained above.

## openBIS roles
141
142
143
144
145
146
147
148
149
150
151
152
153
154
155
156
157
158
159
160
161
162
163
164
165
166
167
168
169
170
171
172
173
174
175
176
177
178
179
180
181
182
183
184
185
186
187
188
189
190
191
192
193
194
195
196
197
198
199
200
201
202
203
204
205
206
207
208
209
210
211
212
213
214
215
216
217
218
219
220
221
222
223
224
225
226
227
228
229
230
231
232
233
234
235
236
237
238
239
240
241
242
243
244
245
246
247
248
### Observer

This role can be assigned to the whole openBIS instance (*Instance
Observer*) or to specific *Spaces* or *Projects* (*Space* or *Project
Observer*). Users with this role have read-only access to the whole
openBIS (*Instance Observer*), or to a specified *Space* or *Project*
(*Space* or *Project Observer*).

An Observer can see and search everything in an openBIS instance or the
*Space/Project* which they have access to. They can also download
datasets. They cannot modify nor delete anything.


### Space/Project User

Extends Observer permissions with some creating and editing
functionality. Permissions are limited to specified *Space(s)* or
*Project(s)*.

Can do everything that Observer and additionally:

-   create
    -   objects
    -   collections
-   edit
    -   objects
    -   collections
    -   projects


### Space/Project Power User

Extends *Space/Projec*t User permissions with some deleting, editing and
processing functionality. Permissions are limited to specified
*Space(s)* or *Project(s)*.

Can do everything that *Space/Project* User and additionally:

-   create projects
-   delete
    -   projects
    -   data sets
    -   objects
    -   collections

Please note that this role cannot be assigned via the ELN UI, only via
admin UI.


### Space/Project Admin

Extends Space/Project Power User permissions allowing to manage roles
and projects inside given *Space(s)* or *Project(s)*.

Can do everything that Space/Project Power User and additionally:

-   assign and remove Space/Project roles


### Instance Admin

Has the full access to given openBIS instance.

Can do everything that Space/Project Admin and additionally:

-   create
    -   space
    -   material
    -   person
    -   property type
    -   vocabulary
    -   material type
    -   object type
    -   collection type
    -   data set type
-   create/delete instance admin role
-   edit
    -   material
    -   property type
    -   property type assignment
    -   vocabulary
    -   material type
    -   object type
    -   collection type
    -   data set type
-   assign/unassign property type
-   delete
    -   space
    -   vocabulary terms
    -   material type
    -   sample type
    -   experiment type
    -   data set type


Please note that this role cannot be assigned via the ELN UI, only via
admin UI.

Updated on April 26, 2023

## User Profile
In the User Profile, a user who is logged in into openBIS can find the
following information:


1.  **First Name**
2.  **Last Name**
3.  **Email**
4.  **openBIS session token**
5.  **Zenodo API Token** ([Export to
262
263
264
265
266
267
268
269
270
271
272
273
274
275
276
277
278
279
280
281
282
283
284
285
286
287
First name, last name and email are automatically filled in when LDAP or
SSO are used for authentication.
In case of file-based authentication, this information can be entered
here directly from the user.

For file-based authentication, users can also change their password
here, from the **Change Password** option under the **More..** dropdown.

Updated on June 28, 2022
## Assign home space to a user
When a home space is assigned to a user, this becomes marked as **My
Space** for that user in the lab notebook, as shown below.

When users are registered via the ELN UI, a *Space* with their username
is created (see [User
304
305
306
307
308
309
310
311
312
313
314
315
316
317
318
319
320
321
322
323
324
325
326
327
328
329
330
and this is automatically set as home space for the user.
The same happens in multi-group instances where spaces are created for
each user in the lab notebook section.
An *instance admin* can change the home space of a user or assign one to
a user that does not have a home space assigned from the admin UI, as
shown below.

Please note that when a user is inactivated, the home space assigned to
that user is moved in the ELN UI to the folder **Others (disabled).** If
this is not desired, the space should be removed as home space from the
inactivated user. This can be done by an *instance admin*.
Updated on April 26, 2023